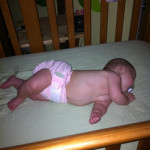
Daughter Person in a cloth diaper at about 6 months old
Now that we’re almost out of diapers (at least during the day), I wanted to post what I think we saved by going with cloth diapers over disposables. Daughter Person has been in cloth diapers ever since we brought her home from the NICU.
She had a horrible reaction to the diapers they put on her in the hospital, and her whole diaper area looked “burned” the entire time she was there. We had already bought the cloth diapers prior to her birth, but that week in the NICU really hardened our resolve to stay with cloth.
Costs
I bought 24 newborn BumGenius diapers for her first few months. I bought them new for $12.95 each ($310.80), and resold them for $10 each on eBay when we were done with them (-$240.00). We have 32 of the one-size pockets (BumGenius), which I bought for ~$16.50 each ($528.00) – I bought them in multi-packs 🙂 I’ve also bought new inserts for 25 of them for $15 shipped free on the slow boat from china ($15). I’ve also bought 25 “refresh” kits to replace the velcro on the larger diapers, they’re $1 each ($25). I’ve not started reselling the diapers yet, but I plan to, and they’re going for about $7-$10 each on eBay depending on condition – I’m going to guess we’re at the $7/diaper side. So far, I’ve spent $638.80 on regular cloth diapers. We went straight to undies for potty training, and we use cloth swim diapers as well ($14.95 each, and I’ve bought 3 – $44.85). We have three wet bags for her diaper pail ($16.50 each), and two travel wet bags ($11.95 each). For all Daughter Person’s cloth needs, we’ve spent $757.05.
What would we have spent on disposables for the same time period?
Assuming that we used store brand diapers (which may or may not have worked for us, I have no idea), I’m going to use Target’s prices for their brand.
We changed Daughter Person 12 times per day for the first three months, and she would have been in size 1-2 diapers: that’s 1,080 changes at .14 per diaper: $151.20
We changed her about 8 times a day until she was 1, and she would have been in the size 2-3 diapers: that’s 2,160 changes at .14 per diaper: $302.40
From a year until 2.5 years, she was changed about 6 times per day, and she would have been in the size 3-4 diapers: that’s 3,240 changes at .16 per diaper: $518.40
Finally, for the last month, we’ve been in undies and diapers at night and nap. We change undies about 5 times per day, and she’d be in pull-ups: that’s 150 changes at .34 per pull-up: $51.
Not to mention the swim diapers we’d have had to buy through all this, we’d have spent $1,024 on just regular diapers.
That’s a difference of $266.95 and we haven’t even sold our cloth diapers yet (an estimated $224. And this is just for one kid! We’re not having another, so those are pretty much our final costs for the cloth diapers. If you had more than one kid, you’d save even more.
Practicality
Using cloth diapers is a bit different than disposables (but not that much!). We have to wash them every 2-3 days. It involves a cold rinse, hot wash, then low dry, and that’s it. It’s just two-three extra loads of laundry per week, which wasn’t that much considering we were already doing all the laundry for her (and my) clothes. There was some cost to the laundering, but I don’t think it was that significant, and we could have line dried to keep it lower.
We found a daycare center that was willing to work with us using the cloth. We stuffed the inserts into the diapers when we did laundry, and from then on, it was just like a disposable diaper – except you don’t throw away the old one. They’d put them in a bag and we’d take them home to wash, and bring in the same number the next morning.
Poop is one reason many give for not using cloth. There are multiple options here. 1) babies who are exclusively breastfed (not Daughter Person) have water soluble poop – nothing special needs to be done, just toss in the wash. 2) liners – you can buy liners which catch solids and you throw them away – we didn’t use those either. 3) a diaper sprayer (or toilet): you rinse off the solids into the toilet, then wash the diaper. We used a sprayer to rinse off the big pieces of solids as soon as we removed the diaper, then put the wet diaper into the pail. Daycare left the solids in the diapers for us to rinse when we got home. It’s really not that bad. Especially since you end up covered in poop anyway, no matter what diaper you use!
Cloth diapers are not for everyone, they take some planning ahead and easy access to washing facilities. Dad preferred the cloth diapers to the disposable ones she was in in the NICU (so did I). I think they’re just easier to use – and they certainly look more colorful!